If you are new to blogging at Blogger.com you might not be aware that tracking and statistics software can be linked to your site to give you details about your visitors. The process of adding a free tracking program such as Google Analytics is relatively straightforward. By following the simple steps below you will gain access to very useful data about the kind of traffic accessing your site. This will help you grow your site and target your content to meet the needs of your visitors.
Steps to Add Google Analytics to Your Blogger Blog
1. Login to Google Analytics
Login to Google Analytics at http://google.com/analytics with your Blogger.com login. If for some reason you wish to create a new account you can do so but be aware that you will lose the advantages of accessing other Google services such as Google Webmaster Tools and Google Adsense without having to log out.
2. Sign Up to Google Analytics
Click on the Sign Up button and you will be taken to the Analytics - New Account Signup page. Enter your blog URL, account name, country, and time zone on this page.
URL
The URL of this blog is blogknowhow.blogspot.com
You would enter nameofyourblog.blogspot.com
Account Name
It is a good idea to choose a general name such as Mike's Account because this will be the account name for anything from 1 to 100 websites.
Click on Continue.
In the next screen you will be prompted to enter your personal details: your name, phone number and country. Complete these and click on Continue.
The final sign up page is the Terms of Agreement screen. Once you agree to these your sign up is complete.
3. Copy the Code Block
After completing the signup process Google Analytics provides you with a code block of javascript to be added to your site.
To copy the code highlight the code block and use the command Ctrl + C to quickly copy the code to the clipboard of your computer. Leave the window open as you are going to return there.
4. Login to Blogger.com at http://www.blogger.com/
In a new window login to your site at Blogger.com and navigate from the Dashboard to the Layout tab.
5. Navigate to Edit HTML in the Layout Menu
From the Layout menu select the Edit HTML link (third from the left after Page Elements and Font and Colors). You are going to be adding a little bit of code to your template so care needs to be taken here not to overwrite any existing code. As a precaution it is advisable to backup your template at this point. You will see the option to do so.
6. Add Code Block to Your Blogger Template
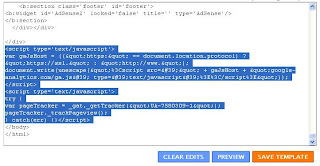
To add the code block to your template you will need to locate the code that closes the body tag. This will be very near the bottom of the template. You will need to paste the code block immediately before the tag.

To paste the code block position the cursor in front of the tag and use the command Ctrl + V. Once the code is placed in your template and you are sure it is positioned correctly click on Save Template. All going well you have now successfully added Google Analytics to your Blogger blog.
7. Return to Google Analytics
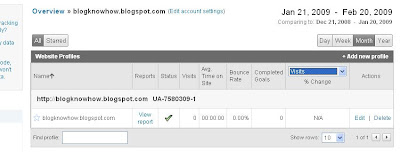
Go back to the Google Analytics window. On the Overview page you will see details about your blog such as Reports, Status, Visits etc. If there is a tick in the status column your Analytics code is working correctly. The screen should look something like the one pictured below.

If the Status contains a yellow triangle symbol with an exclamation mark inside don't despair it just means that Google has not yet updated details of your site. Check back in 24 hours as it can take Google sometime from installing the code to actually providing reports.
Once Google Analytics is successfully receiving data about your site you can begin to make use of the wealth of information at your fingertips.
8. Troubleshooting
If after a day the status still displays a yellow triangle you may need to troubleshoot. A yellow triangle is displayed when the code is not detected or not verified.
Check your Blogger template to ensure the code block is pasted in the correct position.
Further help:
You will find excellent help from Google Analytics at http://www.google.com/support/analytics/.
For details about why Google Analytics is not able to track your site check out
http://www.google.com/support/analytics/bin/answer.py?hl=en_US&answer=57053&utm_id=ad
Steps to Add Google Analytics to Your Blogger Blog
1. Login to Google Analytics
Login to Google Analytics at http://google.com/analytics with your Blogger.com login. If for some reason you wish to create a new account you can do so but be aware that you will lose the advantages of accessing other Google services such as Google Webmaster Tools and Google Adsense without having to log out.
2. Sign Up to Google Analytics
Click on the Sign Up button and you will be taken to the Analytics - New Account Signup page. Enter your blog URL, account name, country, and time zone on this page.
URL
The URL of this blog is blogknowhow.blogspot.com
You would enter nameofyourblog.blogspot.com
Account Name
It is a good idea to choose a general name such as Mike's Account because this will be the account name for anything from 1 to 100 websites.
Click on Continue.
In the next screen you will be prompted to enter your personal details: your name, phone number and country. Complete these and click on Continue.
The final sign up page is the Terms of Agreement screen. Once you agree to these your sign up is complete.
3. Copy the Code Block
After completing the signup process Google Analytics provides you with a code block of javascript to be added to your site.
To copy the code highlight the code block and use the command Ctrl + C to quickly copy the code to the clipboard of your computer. Leave the window open as you are going to return there.
4. Login to Blogger.com at http://www.blogger.com/
In a new window login to your site at Blogger.com and navigate from the Dashboard to the Layout tab.
5. Navigate to Edit HTML in the Layout Menu
From the Layout menu select the Edit HTML link (third from the left after Page Elements and Font and Colors). You are going to be adding a little bit of code to your template so care needs to be taken here not to overwrite any existing code. As a precaution it is advisable to backup your template at this point. You will see the option to do so.
6. Add Code Block to Your Blogger Template
To add the code block to your template you will need to locate the code that closes the body tag. This will be very near the bottom of the template. You will need to paste the code block immediately before the tag.

To paste the code block position the cursor in front of the tag and use the command Ctrl + V. Once the code is placed in your template and you are sure it is positioned correctly click on Save Template. All going well you have now successfully added Google Analytics to your Blogger blog.
7. Return to Google Analytics
Go back to the Google Analytics window. On the Overview page you will see details about your blog such as Reports, Status, Visits etc. If there is a tick in the status column your Analytics code is working correctly. The screen should look something like the one pictured below.

If the Status contains a yellow triangle symbol with an exclamation mark inside don't despair it just means that Google has not yet updated details of your site. Check back in 24 hours as it can take Google sometime from installing the code to actually providing reports.
Once Google Analytics is successfully receiving data about your site you can begin to make use of the wealth of information at your fingertips.
8. Troubleshooting
If after a day the status still displays a yellow triangle you may need to troubleshoot. A yellow triangle is displayed when the code is not detected or not verified.
Check your Blogger template to ensure the code block is pasted in the correct position.
Further help:
You will find excellent help from Google Analytics at http://www.google.com/support/analytics/.
For details about why Google Analytics is not able to track your site check out
http://www.google.com/support/analytics/bin/answer.py?hl=en_US&answer=57053&utm_id=ad
Comments
Post a Comment