
Blogspot blogs at Blogger.com have no categories only labels. This Blogger tutorial will show you how to manually create categories in Blogger from your existing labels so that all the articles listed under a particular label will be displayed.
While this way to add categories to Blogger is not an ideal solution it will mean that you can display a logical grouping of your most popular articles under the one heading.
This article is aimed at new bloggers and beginner bloggers although it is suitable for all Blogger bloggers (Blogspot bloggers). No changes to the template are required to add these categories to your Blogger blog (Blogspot blog).
How to Create Categories from Labels in Blogger
One easy way to create a categories section in Blogger is to simply rename the title of the labels widget as categories. This solution does not work for me because on this blog I have a huge number of labels and I don't want to show this widget at the top of my sidebar.
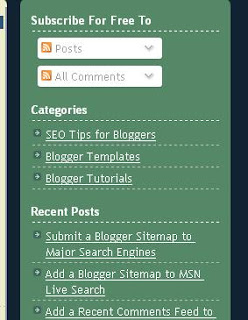
An easy way round this problem is create a separate categories section. If you look at the sidebar of this blog you will notice that I have several major categories at the top so that a new visitor will find what they are looking for quickly under these broad headings.
To add a categories section to a Blogger blog (Blogspot blog) follow these simple steps:
1. Decide how you want to group your articles according to the labels applied and what group heading you want to give to each grouping of articles.
2. For the first category navigate to the individual page of the label you wish to use by clicking on the label in your sidebar. Copy the URL address of this page from the address bar in your browser (right click and select copy). For example the URL address of the label of Blogger Tutorials on this site is:
3. From the Blogger Dashboard go to Design > Page Elements
4. Click Add a Gadget in the sidebar and select Links List
5. In the Configure Link List dialog box that appears paste the link to your label into the New Site URL box
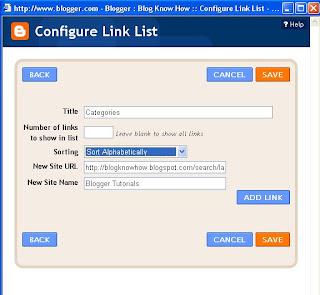
6. Enter the name of your label or some alternative text if you wish into the New Site Name text box.
7. Enter Categories as the title
8. Choose between sort alphabetically, reverse alphabetically or don't sort
9. Click on Add Link to add the link to your new categories list
10. Click on Save
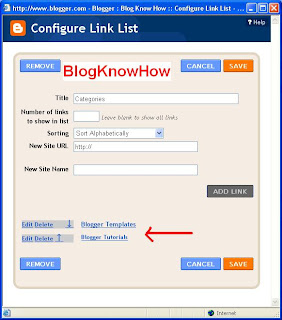
11. For every label you wish to put into the Categories Section copy the link and add it to the Configure Links List. By the end you will end up with two or more categories in your list
12. Use the up and down arrows for each link to shuffle them around until you find the desired order
Limit the Number of Posts Displayed in the Categories Section
To put a limitation on the number of posts displayed in the new categories section you will need to adjust the URL's of each label as follows:
From:
To:
So for the category Blogger Tutorials on this site for example I would enter the following to have only 25 posts displayed:
This Blogger tutorial has shown you how to manually add a categories section to the sidebar of your Blogger Blog (Blogspot blog) using the Link List widget.
Related Articles
List of Blog Know How Tutorials for Blogger Blogs
How to Add CSS Styling to Blockquotes in Blogger
How to Add, Delete or Remove Blogger Image Borders
How to Align and Justify Posts in Blogger
How to Add a Divider Between Blogger Posts
How to Add or Change a Background Image in a Blogger Template
While this way to add categories to Blogger is not an ideal solution it will mean that you can display a logical grouping of your most popular articles under the one heading.
This article is aimed at new bloggers and beginner bloggers although it is suitable for all Blogger bloggers (Blogspot bloggers). No changes to the template are required to add these categories to your Blogger blog (Blogspot blog).
How to Create Categories from Labels in Blogger
One easy way to create a categories section in Blogger is to simply rename the title of the labels widget as categories. This solution does not work for me because on this blog I have a huge number of labels and I don't want to show this widget at the top of my sidebar.
An easy way round this problem is create a separate categories section. If you look at the sidebar of this blog you will notice that I have several major categories at the top so that a new visitor will find what they are looking for quickly under these broad headings.

To add a categories section to a Blogger blog (Blogspot blog) follow these simple steps:
1. Decide how you want to group your articles according to the labels applied and what group heading you want to give to each grouping of articles.
2. For the first category navigate to the individual page of the label you wish to use by clicking on the label in your sidebar. Copy the URL address of this page from the address bar in your browser (right click and select copy). For example the URL address of the label of Blogger Tutorials on this site is:
http://blogknowhow.blogspot.com/search/label/Blogger%20Tutorials3. From the Blogger Dashboard go to Design > Page Elements
4. Click Add a Gadget in the sidebar and select Links List
5. In the Configure Link List dialog box that appears paste the link to your label into the New Site URL box

6. Enter the name of your label or some alternative text if you wish into the New Site Name text box.
7. Enter Categories as the title
8. Choose between sort alphabetically, reverse alphabetically or don't sort
9. Click on Add Link to add the link to your new categories list
10. Click on Save
11. For every label you wish to put into the Categories Section copy the link and add it to the Configure Links List. By the end you will end up with two or more categories in your list
12. Use the up and down arrows for each link to shuffle them around until you find the desired order

Limit the Number of Posts Displayed in the Categories Section
To put a limitation on the number of posts displayed in the new categories section you will need to adjust the URL's of each label as follows:
From:
http://yoursite.blogspot.com/search/label/CategoryNameTo:
http://yoursite.blogspot.com/search/label/CategoryName?max-results=max number of posts to displaySo for the category Blogger Tutorials on this site for example I would enter the following to have only 25 posts displayed:
http://blogknowhow.blogspot.com/search/label/blogger%20Tutorials?max-results=25This Blogger tutorial has shown you how to manually add a categories section to the sidebar of your Blogger Blog (Blogspot blog) using the Link List widget.
Related Articles
List of Blog Know How Tutorials for Blogger Blogs
How to Add CSS Styling to Blockquotes in Blogger
How to Add, Delete or Remove Blogger Image Borders
How to Align and Justify Posts in Blogger
How to Add a Divider Between Blogger Posts
How to Add or Change a Background Image in a Blogger Template
Comments
Post a Comment