
One very simple way to increase page views of your Blogger (Blogspot) blog is to add a recent posts feed to your site. The procedure is easy and effective and does not require any template tweaking. This tutorial assumes limited technical knowledge of Blogger and is mostly aimed at new bloggers and beginners although it is suitable for any Blogspot blogger who wants to increase site traffic.
If you would like to add a recent comments feed to your Blogger (Blogspot) blog please see my tutorial Add a Recent Comments Feed to a Blogger Blog
Below I will take you through the steps of adding a widget so that your feed is displayed in your Blogger blog's sidebar. Unfortunately the maximum number of items that can be displayed in the posts feed at this point is limited to 5 due to a Blogger limitation. I have not found a hack to increase this level but when I do I will update this post.
Add a Recent Posts Feed to the Sidebar of a Blogger Blog
1. Login to you Blogger blog and navigate to Layout > Page Elements
2. Click on Add a Gadget in the sidebar and select the Feed widget
3. A popup dialog box will appear requesting you to configure the URL of your feed. Enter the following text into the box:
Be sure to substitute yoursitename for the name of your site

4. If you have entered the address of your post's feed correctly Blogger will retrieve your feed and display a preview in a dialog box. The feed will include links to the last five posts on your site.
5. Delete the name of your blog and type in Recent Posts instead
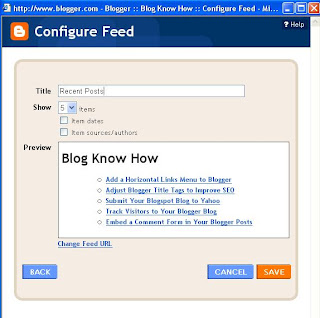
6. Click on Save
7. Click on View Blog to see your new Recent Posts feed in action.
8. If you want to change where it appears in the sidebar this can be achieved by returning to Layout > Page Elements and using the drag and drop feature to position the widget.
Troubleshooting
If you are using a feed delivery service like FeedBurner your default feed URL will be being redirected by Blogger.com. In this case you will need to enter the Feedburner address of the feed which is likely to be something like this:
Notice how Feedburner capitalizes your blog name. Check the exact address at Feedburner if you are not sure of the feed address. For more on burning your feed at Feedburner check out these articles: Blogger RSS Feeds and Feedburner and Burn Blogger RSS Feeds at Feedburner and Add a Feedburner FeedFlare to a Blogger Feed
This tutorial demonstrates how to add a recent posts feed to your Blogger (Blogspot) blog so that it can be displayed in a widget in the sidebar of your Blogger blog.
Related Articles
Add a Recent Comments Feed to a Blogger Blog
Blogger RSS Feeds and Feedburner
Burn Blogger RSS Feeds at Feedburner
Add a Feedburner FeedFlare to a Blogger Feed
If you would like to add a recent comments feed to your Blogger (Blogspot) blog please see my tutorial Add a Recent Comments Feed to a Blogger Blog
Below I will take you through the steps of adding a widget so that your feed is displayed in your Blogger blog's sidebar. Unfortunately the maximum number of items that can be displayed in the posts feed at this point is limited to 5 due to a Blogger limitation. I have not found a hack to increase this level but when I do I will update this post.
Add a Recent Posts Feed to the Sidebar of a Blogger Blog
1. Login to you Blogger blog and navigate to Layout > Page Elements
2. Click on Add a Gadget in the sidebar and select the Feed widget
3. A popup dialog box will appear requesting you to configure the URL of your feed. Enter the following text into the box:
http://yoursitename.blogspot.com/feeds/posts/defaultBe sure to substitute yoursitename for the name of your site

4. If you have entered the address of your post's feed correctly Blogger will retrieve your feed and display a preview in a dialog box. The feed will include links to the last five posts on your site.
5. Delete the name of your blog and type in Recent Posts instead

6. Click on Save
7. Click on View Blog to see your new Recent Posts feed in action.

8. If you want to change where it appears in the sidebar this can be achieved by returning to Layout > Page Elements and using the drag and drop feature to position the widget.
Troubleshooting
If you are using a feed delivery service like FeedBurner your default feed URL will be being redirected by Blogger.com. In this case you will need to enter the Feedburner address of the feed which is likely to be something like this:
http://feeds2.feedburner.com/YourSiteNameNotice how Feedburner capitalizes your blog name. Check the exact address at Feedburner if you are not sure of the feed address. For more on burning your feed at Feedburner check out these articles: Blogger RSS Feeds and Feedburner and Burn Blogger RSS Feeds at Feedburner and Add a Feedburner FeedFlare to a Blogger Feed
This tutorial demonstrates how to add a recent posts feed to your Blogger (Blogspot) blog so that it can be displayed in a widget in the sidebar of your Blogger blog.
Related Articles
Add a Recent Comments Feed to a Blogger Blog
Blogger RSS Feeds and Feedburner
Burn Blogger RSS Feeds at Feedburner
Add a Feedburner FeedFlare to a Blogger Feed
Comments
Post a Comment