
If you have burned your Blogger Blogspot blog feed at Feedburner you can easily add a FeedFlare to the footer of the feed. FeedFlare helps you to distribute, inform and create a community around your content. Adding a FeedFlare to the feed of your blog allows readers to select from a range of social bookmarking links which appear at the end of each post. FeedFlare offers subscribers some easy ways to email, tag, share, and bookmark your blog content by linking them with a range of services such as Stumble Upon, Digg This, Facebook, Technorati, del.icio.us and Mixx.
It is not difficult to add a FeedFlare to your Blogger feed but it does require you to add a snippet of code to the template of your blog. Don't be put off as I will guide you through this process by providing a step by step walkthrough. This tutorial caters for all levels of technical knowledge from the newbie Blogger to the experienced Blogger.
To see a FeedFlare in action right now check out the end of each post in the Blog Know How feed
How to Add a Feed Flare to Your Blogger Feed
If you have yet to burn your Blogger feed at Feedburner please refer to my articles Blogger RSS Feeds and Feedburner and Burn Blogger RSS Feeds at Feedburner for instructions on how to burn your feed and benefits of burning your blog's feed at Feedburner.
1. Login to Feedburner with your Google Account. From the My Feeds page click on the link to your blog
2. By default you will be taken to the Analyze page so you need to select the Optimize tab from the menu
3. Select FeedFlare from the Side Menu
4. To create a simple FeedFlare check the boxes of the options you would like. At a mininum I suggest you select email and comments count (for blogger) in addition to Stumble Upon, Digg This, del.icio.us and Facebook.
5. Once you have selected the desired options you can reorder them in the Preview/Reordering box below using drag and drop to shuffle the links around. I think it is a good idea to have comments either at the beginning or the end of the list as readers are more likely to notice it in this position
6. Click on Activate. Do not close this window as we will be returning here.
7. In a new window login to Blogger if you are not already logged in and navigate to Layout > Edit HTML
8. I strongly suggest you back up your template as a precaution by downloading it to your computer
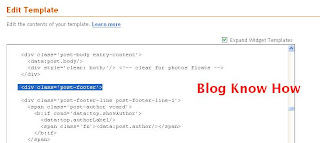
9. Use CTRL + F to bring up the toolbar and enter the following code into the search box
10. Return to the FeedFlare page at Feedburner and select Blogger from the drop down menu at the bottom of the page to get the HTML Feedburner code. A dialog box will appear with some instructions. Copy the code found in item #1. Editing Blogger Layouts. To copy right click your mouse and choose select all to highlight the code and then right click again and choose copy
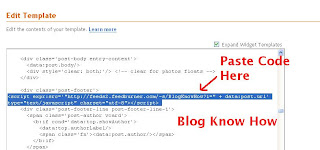
11. Paste the Feedburner code into your template directly below the line of code in your template you just located <div id='post-footer'>
12. Click on the Save Button
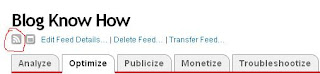
13. Return to Feedburner. Immediately below your blog's title and just above the Analyze tab you will see two icons. Click on the RSS icon (left button) which will bring up your blog feed.
14. Scroll to the bottom of the first post and you will see your new FeedFlare in action.

Other FeedFlare Options
For smarter looking links you may choose to customize the FeedFlare's appearance by tweaking the CSS.
To prevent stealing of your original content otherwise known as blog scraping or splogging you can add personal FeedFlares such as a permalink to a copyright notice and a permalink to you the author of the blog.
In this tutorial you have learned how to create a FeedFlare at Feedburner which appears at the bottom of each post in your Blogger blog's feed. By adding the FeedFlare to the footer of your Blogger blog you help build an online community around your content by offering your readers some choices about how they share, link to and act on the information contained in your blog
Related Articles
Blogger RSS Feeds and Feedburner
Burn Blogger RSS Feed at Feedburner
It is not difficult to add a FeedFlare to your Blogger feed but it does require you to add a snippet of code to the template of your blog. Don't be put off as I will guide you through this process by providing a step by step walkthrough. This tutorial caters for all levels of technical knowledge from the newbie Blogger to the experienced Blogger.
To see a FeedFlare in action right now check out the end of each post in the Blog Know How feed
How to Add a Feed Flare to Your Blogger Feed
If you have yet to burn your Blogger feed at Feedburner please refer to my articles Blogger RSS Feeds and Feedburner and Burn Blogger RSS Feeds at Feedburner for instructions on how to burn your feed and benefits of burning your blog's feed at Feedburner.
1. Login to Feedburner with your Google Account. From the My Feeds page click on the link to your blog
2. By default you will be taken to the Analyze page so you need to select the Optimize tab from the menu
3. Select FeedFlare from the Side Menu
4. To create a simple FeedFlare check the boxes of the options you would like. At a mininum I suggest you select email and comments count (for blogger) in addition to Stumble Upon, Digg This, del.icio.us and Facebook.
5. Once you have selected the desired options you can reorder them in the Preview/Reordering box below using drag and drop to shuffle the links around. I think it is a good idea to have comments either at the beginning or the end of the list as readers are more likely to notice it in this position
6. Click on Activate. Do not close this window as we will be returning here.
7. In a new window login to Blogger if you are not already logged in and navigate to Layout > Edit HTML
8. I strongly suggest you back up your template as a precaution by downloading it to your computer
9. Use CTRL + F to bring up the toolbar and enter the following code into the search box
<div id='post-footer'>

10. Return to the FeedFlare page at Feedburner and select Blogger from the drop down menu at the bottom of the page to get the HTML Feedburner code. A dialog box will appear with some instructions. Copy the code found in item #1. Editing Blogger Layouts. To copy right click your mouse and choose select all to highlight the code and then right click again and choose copy
11. Paste the Feedburner code into your template directly below the line of code in your template you just located <div id='post-footer'>

12. Click on the Save Button
13. Return to Feedburner. Immediately below your blog's title and just above the Analyze tab you will see two icons. Click on the RSS icon (left button) which will bring up your blog feed.
14. Scroll to the bottom of the first post and you will see your new FeedFlare in action.

Other FeedFlare Options
For smarter looking links you may choose to customize the FeedFlare's appearance by tweaking the CSS.
To prevent stealing of your original content otherwise known as blog scraping or splogging you can add personal FeedFlares such as a permalink to a copyright notice and a permalink to you the author of the blog.
In this tutorial you have learned how to create a FeedFlare at Feedburner which appears at the bottom of each post in your Blogger blog's feed. By adding the FeedFlare to the footer of your Blogger blog you help build an online community around your content by offering your readers some choices about how they share, link to and act on the information contained in your blog
Related Articles
Blogger RSS Feeds and Feedburner
Burn Blogger RSS Feed at Feedburner
Comments
Post a Comment