
In this tutorial I will show you how to set a different date from the actual date when posting to your Blogger Blogspot blog and discuss some of the benefits and uses of setting a different date.
Benefits of Setting a Different Date
Blogger permits a Blogger webmaster to set any publication date for a post they choose. This flexibility means that when you publish your entry it can be published retrospectively, in the here and now or for a future date. There are a variety of reasons for setting a particular publishing date for a post:
Set a Retrospective Publication Date
Some examples of situations where you may find it useful to set a post to a retrospective date are:
In order to keep continuity with a sequence of articles. You might use this feature if you forget to post an article in a sequence or decide afterwards to add an extra article to the sequence.
Another application for the retrospective date feature is to create a page such as an About page and attribute a specific date to it. I have gone back and written an About page on several of my blogs long after I have set them up. It is possible to go back several years if you wish. I would recommend setting the date of your About page to prior to your first post so that it appears at the beginning of your feed.
Bear in mind when posting to a retrospective date that the post will still appear in your recent posts feed even though you set a date in the past. While this can be annoying at times it is not much of a problem unless you rarely post to your blog.
Set a Future Publication Date
It is very handy to set a future publication date for your blog entries. One obvious time is when you go on vacation and want to stagger the publication of posts you have already written. Blogger allows you to set up your posts to be published on a specified date and time simply by setting a future date and time.
If you write a lot of articles about a particular theme it can be very useful to publish them in a set sequence. Blogger will allow you to set a future date for each article so that they can be published in the sequence you have chosen. For instance you might have written 7 articles on a theme and wish to publish them every 2 days over two weeks. Blogger will allow you to choose a future date for each of the articles and schedule them for publication on that user defined date and time.
How to Set a User Defined Publication Date
1. Create a post for your Blogger blog as usual
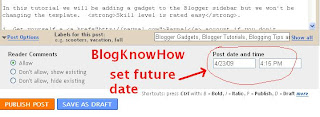
2. Click on the Post Options link found at the bottom left corner of the Compose box and directly above the Publish Post button
3. Set the specified date and time you wish your post to be published on
4. Click on the Publish Post button
If you have set a retrospective date your post will be published immediately and you will be able to view it in your blog archives.
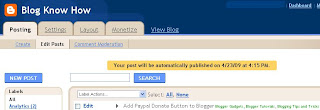
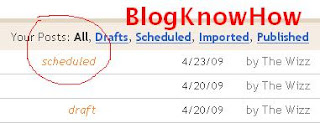
If you set a future date your post will be scheduled for publication. Click on the link to Edit Posts and view your post in the list. It should be at the top of the list. Notice that it will marked "scheduled" in red. When the exact date and time set is arrived at Blogger will publish your post automatically.
In this tutorial I have discussed reasons why you might choose to set your own user defined post date for your Blogger posts. I have also shown you how to go about setting a different post date through the Post Options feature in Blogger.
Benefits of Setting a Different Date
Blogger permits a Blogger webmaster to set any publication date for a post they choose. This flexibility means that when you publish your entry it can be published retrospectively, in the here and now or for a future date. There are a variety of reasons for setting a particular publishing date for a post:
Set a Retrospective Publication Date
Some examples of situations where you may find it useful to set a post to a retrospective date are:
In order to keep continuity with a sequence of articles. You might use this feature if you forget to post an article in a sequence or decide afterwards to add an extra article to the sequence.
Another application for the retrospective date feature is to create a page such as an About page and attribute a specific date to it. I have gone back and written an About page on several of my blogs long after I have set them up. It is possible to go back several years if you wish. I would recommend setting the date of your About page to prior to your first post so that it appears at the beginning of your feed.
Bear in mind when posting to a retrospective date that the post will still appear in your recent posts feed even though you set a date in the past. While this can be annoying at times it is not much of a problem unless you rarely post to your blog.
Set a Future Publication Date
It is very handy to set a future publication date for your blog entries. One obvious time is when you go on vacation and want to stagger the publication of posts you have already written. Blogger allows you to set up your posts to be published on a specified date and time simply by setting a future date and time.
If you write a lot of articles about a particular theme it can be very useful to publish them in a set sequence. Blogger will allow you to set a future date for each article so that they can be published in the sequence you have chosen. For instance you might have written 7 articles on a theme and wish to publish them every 2 days over two weeks. Blogger will allow you to choose a future date for each of the articles and schedule them for publication on that user defined date and time.
How to Set a User Defined Publication Date
1. Create a post for your Blogger blog as usual
2. Click on the Post Options link found at the bottom left corner of the Compose box and directly above the Publish Post button
3. Set the specified date and time you wish your post to be published on

4. Click on the Publish Post button
If you have set a retrospective date your post will be published immediately and you will be able to view it in your blog archives.

If you set a future date your post will be scheduled for publication. Click on the link to Edit Posts and view your post in the list. It should be at the top of the list. Notice that it will marked "scheduled" in red. When the exact date and time set is arrived at Blogger will publish your post automatically.

In this tutorial I have discussed reasons why you might choose to set your own user defined post date for your Blogger posts. I have also shown you how to go about setting a different post date through the Post Options feature in Blogger.
Comments
Post a Comment