
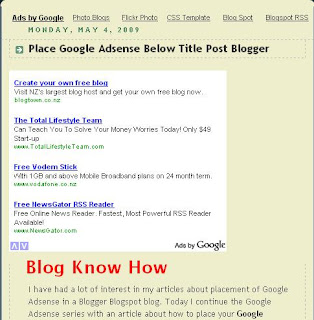
I have had a lot of interest in my articles about placement of Google Adsense in a Blogger Blogspot blog. Today I continue the Google Adsense series with an article about how to place your Google Adsense ad unit below the post title in Blogger.
This ad placement requires pasting the Google Adsense code directly into your Blogger template. While not difficult I have rated the skill level as intermediate as it requires parsing (conversion of the Javascript into a format readable by Blogger) of the Google Adsense code first before pasting it into your template. For the benefit of newbies and beginner Bloggers I have broken down the steps to simplify the process and make it more manageable. What follows is a detailed step by step tutorial on how to place Google Adsense below the post title in a Blogger blog including how to create a Google Adsense ad unit if you don't already have one.
Steps to Place Google Adsense Below Blogger Post Title
Follow Steps 1-11 if you don't have a Google Adsense ad unit.
IF YOU ALREADY HAVE A GOOGLE ADSENSE UNIT SKIP TO #12
1. From the Blogger Dashboard click on the Google Adsense link at the bottom of the page
2. Proceed to Adsense Setup > Get Ads or sign up for Google Adsense if not already
3. Choose Adsense for Content from the Ad Setup screen
4. Choose Ad unit or Link unit from the Adsense for Content screen. In most cases you will want an ad unit.
5. Choose the Ad Type from the dropdown menu depending on your needs. I often select text only because I think they are better performers but you may have a different experience. Click on the Continue button
6. Choose the Ad Format. Most likely this will be between 336x280, 250x250, or the 468x60 banner sizes.
7. Choose your color palette according to your blog color scheme.
8. Accept the default font in the meantime unless you know the font that you need. You can always check this out later by reviewing your template
9. Click on the Continue button
10. Create an Ad Channel by clicking the link add a new channel. By default Google will add this to Your Selected Channels. Click on the Continue button
11. You may need to give your ad unit a more detailed name. I recommend keeping the dimensions of the ad unit in the name as it makes the unit easily identifiable. I usually add the name of the blog to the name because I have several blogs. Save and Get Ad Code by clicking on the Submit and Get Code button.
START HERE IF YOU HAVE A GOOGLE ADSENSE AD UNIT
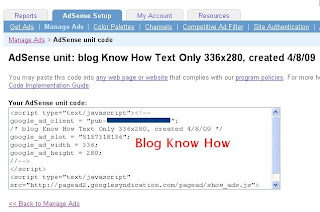
12. Copy the Adsense code by right clicking the mouse while it is in the code box. Choose select all and then right click again and choose copy. Make sure you get all of the code
13. Open the Ad Converter by following this link to Centricle.
14. Paste the Google Adsense code into the converter and press the Convert Ad Code button. This will parse the code so that Blogger will read the Javascript properly. Leave this window open for now as we will be returning here. Note that pasting Google Adsense code in to your Blogger template that has not been parsed will produce errors
15. Login to Blogger if not already logged in
16. Navigate to Layout > Edit HTML
17. Back up your Template (recommended) by downloading it to your computer
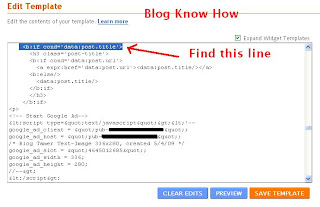
18. Check the Expand Widgets Template checkbox
19. Bring up Blogger Search using CTRL + F. Copy and paste the following line of code into the text box to locate the block of code in your template beginning with this line:
Code Block to Find
20. Return to the Ad Converter and copy the converted code by right clicking your mouse and choosing select all followed by right clicking again to copy it
21. Paste this code directly after the above code block:
22. Paste your Google Adsense ad code between <!-- Start Google Ad --> and <!-- End Google Ad -->
23. Click the Save Template button
24. Take a look at your new Google Adsense ad unit in your blog by following the View Blog link.
Troubleshooting Your New Google Adsense Below the Post Title
In this tutorial I have covered the steps involved in creating a new Google Adsense ad unit at Google Adsense. I have also provided a detailed walkthrough of the steps involved in adding a Google Adsense ad unit below the post title in a Blogger Blogspot blog. Let me know how you get on.
Related Articles
Bloggers Guide to Google Adsense Myths
Add Google Adsense to Blogger Header
Add Google Adsense or Banner Above Blogger Header
Better Placement of Google Adsense in Blogger
Google Adsense Tips for a Blogger Blog
Add a Banner or Google Adsense Above Blogger Header
This ad placement requires pasting the Google Adsense code directly into your Blogger template. While not difficult I have rated the skill level as intermediate as it requires parsing (conversion of the Javascript into a format readable by Blogger) of the Google Adsense code first before pasting it into your template. For the benefit of newbies and beginner Bloggers I have broken down the steps to simplify the process and make it more manageable. What follows is a detailed step by step tutorial on how to place Google Adsense below the post title in a Blogger blog including how to create a Google Adsense ad unit if you don't already have one.

Steps to Place Google Adsense Below Blogger Post Title
Follow Steps 1-11 if you don't have a Google Adsense ad unit.
IF YOU ALREADY HAVE A GOOGLE ADSENSE UNIT SKIP TO #12
1. From the Blogger Dashboard click on the Google Adsense link at the bottom of the page
2. Proceed to Adsense Setup > Get Ads or sign up for Google Adsense if not already
3. Choose Adsense for Content from the Ad Setup screen
4. Choose Ad unit or Link unit from the Adsense for Content screen. In most cases you will want an ad unit.
5. Choose the Ad Type from the dropdown menu depending on your needs. I often select text only because I think they are better performers but you may have a different experience. Click on the Continue button
6. Choose the Ad Format. Most likely this will be between 336x280, 250x250, or the 468x60 banner sizes.
7. Choose your color palette according to your blog color scheme.
Tip: I find the best way to get the colors for my ads if I am not sure is to create an Adsense unit in Blogger and transfer that color scheme to the new ad unit in Google. Alternatively you can accept the default and change the color scheme later. Changing the color scheme won't affect your ad unit code for your template.
8. Accept the default font in the meantime unless you know the font that you need. You can always check this out later by reviewing your template
9. Click on the Continue button
10. Create an Ad Channel by clicking the link add a new channel. By default Google will add this to Your Selected Channels. Click on the Continue button
11. You may need to give your ad unit a more detailed name. I recommend keeping the dimensions of the ad unit in the name as it makes the unit easily identifiable. I usually add the name of the blog to the name because I have several blogs. Save and Get Ad Code by clicking on the Submit and Get Code button.
START HERE IF YOU HAVE A GOOGLE ADSENSE AD UNIT
12. Copy the Adsense code by right clicking the mouse while it is in the code box. Choose select all and then right click again and choose copy. Make sure you get all of the code

13. Open the Ad Converter by following this link to Centricle.
14. Paste the Google Adsense code into the converter and press the Convert Ad Code button. This will parse the code so that Blogger will read the Javascript properly. Leave this window open for now as we will be returning here. Note that pasting Google Adsense code in to your Blogger template that has not been parsed will produce errors
15. Login to Blogger if not already logged in
16. Navigate to Layout > Edit HTML
17. Back up your Template (recommended) by downloading it to your computer
18. Check the Expand Widgets Template checkbox
19. Bring up Blogger Search using CTRL + F. Copy and paste the following line of code into the text box to locate the block of code in your template beginning with this line:
<b:if cond='data:post.title'>Code Block to Find
<b:if cond='data:post.title'>
      <h3 class='post-title'>
      <b:if cond='data:post.url'>
        <a expr:href='data:post.url'><data:post.title/></a>      <b:else/>
        <data:post.title/>
      </b:if>
      </h3>
    </b:if>
20. Return to the Ad Converter and copy the converted code by right clicking your mouse and choosing select all followed by right clicking again to copy it
21. Paste this code directly after the above code block:
<p>
<!-- Start Google Ad-->
<!-- End Google Ad-->
</p>
22. Paste your Google Adsense ad code between <!-- Start Google Ad --> and <!-- End Google Ad -->

23. Click the Save Template button
24. Take a look at your new Google Adsense ad unit in your blog by following the View Blog link.
Troubleshooting Your New Google Adsense Below the Post Title
- Note only a placeholder will show up for about the first 10 minutes or so. If no placeholder appears go back and retrace your steps to make sure you haven't forgotten something. Check you have copied the code exactly.
- If you need more white space between the ad unit and the start of the first line of your article add this html tag
<p>before your Google Adsense code and this</p>after the last line of your Google Adsense code - If you have Google Adsense ad units in other parts of your blog you will find that only 3 Google Adsense ad units will display on one page at any one time according to Adsense rules. for this reason you may get a placeholder appearing for some of your earlier posts which appear further down the page. To counter this problem I suggest you set the number of posts on a page to 3 if you have no other ad units anywhere else and 2 if you have another unit some where else. Linked units are not included in this only ad units.
In this tutorial I have covered the steps involved in creating a new Google Adsense ad unit at Google Adsense. I have also provided a detailed walkthrough of the steps involved in adding a Google Adsense ad unit below the post title in a Blogger Blogspot blog. Let me know how you get on.
Related Articles
Bloggers Guide to Google Adsense Myths
Add Google Adsense to Blogger Header
Add Google Adsense or Banner Above Blogger Header
Better Placement of Google Adsense in Blogger
Google Adsense Tips for a Blogger Blog
Add a Banner or Google Adsense Above Blogger Header
Comments
Post a Comment