
In today's Blogger tutorial you will learn just how easy it is to place an affiliate banner at the end of each post of a Blogger blog (Blogspot blog). This is a relatively easy task but does require adding a short snippet of code to your Blogger template. For those new to Blogger or without much technical knowledge don't worry as I have broken down the steps so that anyone can follow them even virtual beginners.
For instructions on how to add affiliate banners to other areas of a Blogger blog (Blogspot blog) please consult these tutorials:
Add an Affiliate Banner or Adsense Above Blogger Header
Add an Affiliate Banner to Blogger Header
Add an Affiliate Banner to Blogger Sidebar
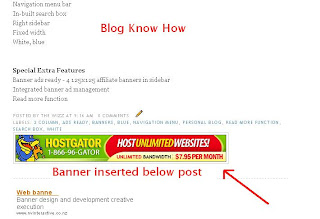
How to Add an Affiliate Banner Below a Blogger Post
The instructions below will place an affiliate banner below each post in your blog. The banner will appear on all pages including the home page. If you want faster loading times and the banner to appear only on individual post pages see tips and troubleshooting below for instructions on how to restrict the banner display to post pages only.
1. Login to Blogger if not already logged in
2. Navigate to Design > Edit HTML
3. Back up your Blogger template as a precaution by downloading to your computer
4. Check the Expand Widgets Template box
5. Find the following lines in your Blogger template with CTRL + F to bring up the search box
6. Paste your affiliate banner code between these two lines
Once you have finished your code should like something like the following which places a horizontal banner (468x60) in the post footer but any size banner can be inserted below each post provided your template is wide enough to accommodate it:
7. Save Template
8. Click on View Blog to see your new affiliate banner in action

Tips and Troubleshooting
In today's Blogger tutorial you have learned how to place an affiliate banner at the bottom of a post in a Blogger blog (Blogspot blog). This banner will be the same for each post and only displays on the individual post page. If you would like to know more about adding banners to Blogger please consult the list of tutorials below.
Related Articles
List of Blog Know How Tutorials for Blogger Blogs
Add Chititka Ads to Blogger Blogspot Blog
Add an Affiliate Banner or Adsense Above Blogger Header
Add an Affiliate Banner to Blogger Header
Add an Affiliate Banner to Blogger Sidebar
5 Ways to Make Money from Blogger
Blogger Guide to Google Adsense Placement
For instructions on how to add affiliate banners to other areas of a Blogger blog (Blogspot blog) please consult these tutorials:
Add an Affiliate Banner or Adsense Above Blogger Header
Add an Affiliate Banner to Blogger Header
Add an Affiliate Banner to Blogger Sidebar
How to Add an Affiliate Banner Below a Blogger Post
The instructions below will place an affiliate banner below each post in your blog. The banner will appear on all pages including the home page. If you want faster loading times and the banner to appear only on individual post pages see tips and troubleshooting below for instructions on how to restrict the banner display to post pages only.
1. Login to Blogger if not already logged in
2. Navigate to Design > Edit HTML
3. Back up your Blogger template as a precaution by downloading to your computer
4. Check the Expand Widgets Template box
5. Find the following lines in your Blogger template with CTRL + F to bring up the search box
<div class='post-footer-line post-footer-line-3'/>
</div>
6. Paste your affiliate banner code between these two lines
<div class='post-footer-line post-footer-line-3'/>
Place the affiliate banner code here
</div>
Once you have finished your code should like something like the following which places a horizontal banner (468x60) in the post footer but any size banner can be inserted below each post provided your template is wide enough to accommodate it:
<div class='post-footer-line post-footer-line-3'/><a href='https://chitika.com/publishers.php?refid=XXXXXX' style='text-decoration: none;' title='Get Chitika | Premium'><img alt='Get Chitika | Premium' border='0' src='http://scripts.chitika.net/eminimalls/logos/468x60.png' title='Get Chitika | Premium'/></a>
</div>

7. Save Template
8. Click on View Blog to see your new affiliate banner in action
Tips and Troubleshooting
- If your template does not have these lines it may only have two post footer lines in which case you can do one of two things
- Add these lines to your template:
<div class='post-footer-line post-footer-line-3'/>
Place the affiliate banner code here
</div> - Or place the affiliate banner code between the following lines:
<div class='post-footer-line post-footer-line-2'/>
Place the affiliate banner code here
</div>
- Add these lines to your template:
- If you would like the banner to appear below your post only on the post page and not the home page then you will need to add an if statement to the code as follows:
<div class='post-footer-line post-footer-line-3'/>
<b:if cond='data:blog.pageType == "item"'>
Paste affiliate banner code here
</b:if>
</div> - If you are having problems adding the affiliate banner code to the template make sure that only single quotes are used. The Blogger template code is sensitive to this and usually doesn't accept double quotes
In today's Blogger tutorial you have learned how to place an affiliate banner at the bottom of a post in a Blogger blog (Blogspot blog). This banner will be the same for each post and only displays on the individual post page. If you would like to know more about adding banners to Blogger please consult the list of tutorials below.
Related Articles
List of Blog Know How Tutorials for Blogger Blogs
Add Chititka Ads to Blogger Blogspot Blog
Add an Affiliate Banner or Adsense Above Blogger Header
Add an Affiliate Banner to Blogger Header
Add an Affiliate Banner to Blogger Sidebar
5 Ways to Make Money from Blogger
Blogger Guide to Google Adsense Placement
Comments
Post a Comment