
In today's tutorial you will learn how to place an Amazon widget on your Blogger blog (Blogspot blog) to enable you to add a further income stream to your existing Blogger earnings.
Adding an Amazon widget to Blogger is not difficult. No change or very little change to your Blogger template is required. There is some time involved in setting up the widget itself and choosing the products to link to and customizing the look to match your blog however. This tutorial will walk you through the steps involved but first a few need to know facts about Amazon's affiliate program.
Important Details For Bloggers About Amazon's Affiliate Program
Earning Money from Amazon Widgets
Linking to Amazon products on your blog can generate significant income depending on your blog topic and the type of links you choose. I personally find that my sales are not always related to blogging despite the Amazon widget on this blog linking to books about blogging. However I would strongly suggest that you try to match the products offerred to the general content of your blog so that your links are targeted to your blog's audience. Another option is to add a generic Amazon widget such as the Deals Widget to snag those bargain hunters and impulse buyers from your readership.
Placing Amazon Widgets on Blogger
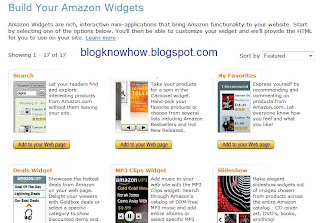
There are 17 different Amazon widgets to choose from. The decision about which widget is best will partly be determined by the type of blog you have and where you want to place the widget.
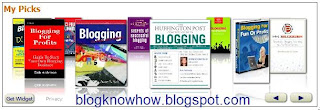
I have had some success with the Carousel Widget that I have on Blogspot Blogger Guide - another of my blogs. I have found under the header to be a prime location for this gadget and as it is displayed on every page the widget is getting maximum exposure. I have also had moderate success with a sidebar location using the I Recommend widget. I think it is true to say that you will need to experiment a bit to find the best type of widget for your blog.
How to Add an Amazon Widget to a Blogger Blogspot Blog
Difficulty Level: Easy to Moderate
Tips and Troubleshooting
Some placements of Amazon widgets will require tweaks to your Blogger template. For instance the Carousel widget which I mentioned earlier I inserted under the header in my blog. To place an Amazon widget or for that matter any widget below the header and above the first post in Blogger do the following:
In this tutorial you have learnt about adding Amazon widgets to a Blogger Blogspot blog in order to earn cash from referral fees. Most bloggers earn around 4 to 6.5% in commission for items shipped from Amazon. While not the best affiliate scheme Amazon referral fees can add up to tidy sum at the end of the month. I would recommend giving it a try. You will need to experiment to get the best fit of location and widget. Good luck and let me know how you get on.
Related Articles
Add Amazon Product Links to Blogger Posts
List of Blog Know How Tutorials for Blogger Blogs
Add Chititka Ads to Blogger Blogspot Blog
Add an Affiliate Banner or Adsense Above Blogger Header
Add an Affiliate Banner to Blogger Header
Add an Affiliate Banner to Blogger Sidebar
Add an Affiliate Banner Below Blogger Post
Make Money Add Banner Ads to Blogger
5 Ways to Make Money from Blogger
Blogger Guide to Google Adsense Placement
Add Paypal Donate Button to Blogger
Blogger Guide to Google Adsense Myths
Adding an Amazon widget to Blogger is not difficult. No change or very little change to your Blogger template is required. There is some time involved in setting up the widget itself and choosing the products to link to and customizing the look to match your blog however. This tutorial will walk you through the steps involved but first a few need to know facts about Amazon's affiliate program.

Important Details For Bloggers About Amazon's Affiliate Program
- Amazon have 2 referral structures: Classic Plan and Performance Plan
- For the Classic Plan - A flat rate commission of 4% is paid
- For the Performance Plan - A sliding scale between 4% and 8.5% commission is paid on general product items shipped. Consumer electronics is paid at a flat rate of 4%. Kindle, MP3,video on demand and game downloads are at the rate of 10%. View fee structure for Performance Plan
- For the Classic Plan - A flat rate commission of 4% is paid
- Sell 7 items in a month and you will receive 6% commission on sales. Sell in excess of 30 items and receive referral fees at the rate of 6.5%
- Affiliates earn commission on the total of items shipped not just the first product bought
- Payment options are direct credit, check or Amazon Gift Certificate. There is a $15 charge for the issue of a check.
- Payment of referral fees is made once your account reaches $10 provided you have opted for the direct credit or Amazon Gift Certificate option. Otherwise it is $100 for a check (cheque)
- Amazon offer a choice of 17 different widgets
- Amazon also offer links and banners and an astore option

Earning Money from Amazon Widgets
Linking to Amazon products on your blog can generate significant income depending on your blog topic and the type of links you choose. I personally find that my sales are not always related to blogging despite the Amazon widget on this blog linking to books about blogging. However I would strongly suggest that you try to match the products offerred to the general content of your blog so that your links are targeted to your blog's audience. Another option is to add a generic Amazon widget such as the Deals Widget to snag those bargain hunters and impulse buyers from your readership.
Placing Amazon Widgets on Blogger
There are 17 different Amazon widgets to choose from. The decision about which widget is best will partly be determined by the type of blog you have and where you want to place the widget.
I have had some success with the Carousel Widget that I have on Blogspot Blogger Guide - another of my blogs. I have found under the header to be a prime location for this gadget and as it is displayed on every page the widget is getting maximum exposure. I have also had moderate success with a sidebar location using the I Recommend widget. I think it is true to say that you will need to experiment a bit to find the best type of widget for your blog.
How to Add an Amazon Widget to a Blogger Blogspot Blog
Difficulty Level: Easy to Moderate
- Join Amazon's Referral Program and create an affiliate account at Amazon. You will need to supply your direct deposit details as Amazon charges to issue affiliate checks (cheques)
- Once your affiliate registration is confirmed (this is a fast process) you will then be ready to start to create an Amazon widget for your blog. So go ahead and login to your affiliate account at Amazon and click on the widgets tab
- Now comes the fun part - choosing a widget. Amazon currently have 17 different widgets to choose from. The Amazon help section is good and I suspect will answer most of your questions if you get stuck.
- Choose your widget. For the purposes of this demonstration let's choose a Recommended Product Links widget. Click on the Add to Your Webpage button
- From the drop down select a product line eg Cameras and Photo. Select a subcategory eg General Bestsellers. Click the Continue button.

- Select the size of widget according to the location where it will be placed on your blog eg 160x600 in the sidebar of Blogger. Click on the Select This Size button at the right of the example widget

- Now you will need to customize your widget. Click on Customize Link Appearance and enter link and text colors to suit your blog. Ensure that the widget opens in a new window unless you are quite happy for your readers to leave your blog. Leave this window open in the meantime as we will be returning

- In a new window login to Blogger if not already logged in
- Navigate to Layout > Page Elements
- Click on Add Gadget in the sidebar and choose HTML/Javascript from the list of available gadgets
- Copy the widget code which contains Amazon's tracking code and paste it into the content area of the gadget. Add a title if you wish. Click the Save button
- Use the drag and drop feature to reposition your widgets in the sidebar in the order that you want them to appear. Save any changes
- Click on View Blog and admire your new widget in the sidebar of your blog


Tips and Troubleshooting
Some placements of Amazon widgets will require tweaks to your Blogger template. For instance the Carousel widget which I mentioned earlier I inserted under the header in my blog. To place an Amazon widget or for that matter any widget below the header and above the first post in Blogger do the following:
- Login to Blogger if not already logged in
- Navigate to Layout > Edit HTML
- Find the following line of code
<b:section class='crosscol' id='crosscol' showaddelement='no'/>
- Replace the no with yes and click the Save button
- Navigate to Layout > Page Elements
- You will see that you can now add a gadget below the header
In this tutorial you have learnt about adding Amazon widgets to a Blogger Blogspot blog in order to earn cash from referral fees. Most bloggers earn around 4 to 6.5% in commission for items shipped from Amazon. While not the best affiliate scheme Amazon referral fees can add up to tidy sum at the end of the month. I would recommend giving it a try. You will need to experiment to get the best fit of location and widget. Good luck and let me know how you get on.
Related Articles
Add Amazon Product Links to Blogger Posts
List of Blog Know How Tutorials for Blogger Blogs
Add Chititka Ads to Blogger Blogspot Blog
Add an Affiliate Banner or Adsense Above Blogger Header
Add an Affiliate Banner to Blogger Header
Add an Affiliate Banner to Blogger Sidebar
Add an Affiliate Banner Below Blogger Post
Make Money Add Banner Ads to Blogger
5 Ways to Make Money from Blogger
Blogger Guide to Google Adsense Placement
Add Paypal Donate Button to Blogger
Blogger Guide to Google Adsense Myths
Comments
Post a Comment