
In this Blogger tutorial you will learn how to insert jump breaks into your Blogger posts (Blogspot posts) as an aid to quick navigation for your visitors. Jump Breaks in Blogger provide an easy way to show only a snippet of your whole post on the home page of your blog with a read more link below it for the rest of the story.
I have already written about a Blogger expandable post summaries hack which provides a read more feature for a Blogger blog homepage. For most Blogger webpublishers (Blogspot webpublishers) this hack is no longer necessary because Blogger as part of its 10th birthday celebration introduced a new feature called Jump Breaks. I cover several methods to insert jump breaks depending on whether you are using a Blogger default template or a customized Blogger template.
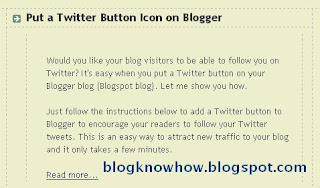
The advantage of adding jump breaks to your Blogger posts is that your readers can quickly and easily skim your most recent posts for what interests them rather than having to scroll through a whole bunch of long articles. This is definitely a big help for those of us like me who often write articles longer than 500 words. If your posts are short and sweet you may find that adding this read more feature is unnecessary however you can still apply it when you do have a longer post. Below is an example post which illustrates the Jump Break feature in action.
How to Insert Jump Breaks (Read More Links) in Blogger
It is easy to insert a Jump Break into your Blogger posts (Blogspot posts) at any point of your choosing.
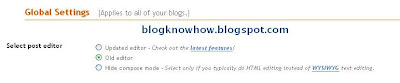
There are two methods of inserting the Jump Breaks in Blogger. Which method you choose depends on which post editor you are using. If you are not sure which editor you are using check this out by going to Settings > Basic and scrolling to the bottom of the page. Under Global Settings you will see a radio button next to old editor or updated editor.
Tips and Troubleshooting
In this tutorial you have learned how to create expandable post summaries using the new Blogger feature Jump Breaks. You now have the option to easily insert Jump Breaks into your Blogger posts so that longer posts appear with only an introduction followed by a Read More link.
I have shown you 2 methods to insert the Jump Breaks and Read More links into your Blogger posts depending on whether you are using the new or old post editor features. I have also given you some tips to make sure you get the most out of the Blogger Jump Break feature including what to do if the Jump Breaks feature does not work with your customized Blogger template. As always I would welcome your feedback about your experiences with the expandable post summaries Blogger feature (Blogspot feature) or any other feature you may be having an issue with.
Related Articles
List of Blog Know How Tutorials for Blogger Blogs
Blogger Buzz - You Might as well Jump!
I have already written about a Blogger expandable post summaries hack which provides a read more feature for a Blogger blog homepage. For most Blogger webpublishers (Blogspot webpublishers) this hack is no longer necessary because Blogger as part of its 10th birthday celebration introduced a new feature called Jump Breaks. I cover several methods to insert jump breaks depending on whether you are using a Blogger default template or a customized Blogger template.
The advantage of adding jump breaks to your Blogger posts is that your readers can quickly and easily skim your most recent posts for what interests them rather than having to scroll through a whole bunch of long articles. This is definitely a big help for those of us like me who often write articles longer than 500 words. If your posts are short and sweet you may find that adding this read more feature is unnecessary however you can still apply it when you do have a longer post. Below is an example post which illustrates the Jump Break feature in action.

How to Insert Jump Breaks (Read More Links) in Blogger
It is easy to insert a Jump Break into your Blogger posts (Blogspot posts) at any point of your choosing.
There are two methods of inserting the Jump Breaks in Blogger. Which method you choose depends on which post editor you are using. If you are not sure which editor you are using check this out by going to Settings > Basic and scrolling to the bottom of the page. Under Global Settings you will see a radio button next to old editor or updated editor.

- Method 1
Insert Jump Breaks - New Blogger Post Editor Only
In order to use this method you need to be using the updated editor in Blogger or have Blogger in Draft enabled.- When creating a new post in the Blogger Post Editor position the cursor in the editor at the point you wish the Jump Break to be inserted
- Click on the insert Jump Break icon (currently the last option on the menu)

- A jagged dividing line will appear to mark the insertion point

- Publish your post as normal
- When creating a new post in the Blogger Post Editor position the cursor in the editor at the point you wish the Jump Break to be inserted
- Method 2
Insert Jump Breaks - Old Blogger Post Editor Only
If you are using the old post editor rather than the new post editor you can still insert jump breaks into your Blogger posts.- When creating a new post in the Blogger Post Editor make sure you are in the Edit HTML mode rather than compose mode
- Insert the following code at the point where you want to break the Jump Break to occur:
<!-- more -->
- Publish post as normal
- When creating a new post in the Blogger Post Editor make sure you are in the Edit HTML mode rather than compose mode


Tips and Troubleshooting
- To Add Jump Breaks to New Posts Automatically
To save time it is possible to automatically add Jump Breaks to posts with the following method:- Go to Settings > Formatting and scroll to the bottom of the page
- Under Post Template paste <!-- more --> into the box and save. The next time you create a new post the <!-- more --> will automatically appear. Make sure you are in the Edit HTML mode to see <!-- more --> appear.

- Go to Settings > Formatting and scroll to the bottom of the page
- To Change the Read More Text
If you want to change the Read More text for something like Read Full Story or Continue Reading you can easily do this by:- Go to Design > Page Elements
- Edit the Blog Posts widget
- Change the post page link text (Read More text) which appears at the top of the page to your preferred text and save

- Go to Design > Page Elements
- To Manually Add Jump Breaks to Blogger For Users of Customized Templates
If you are using highly a customized template or have customized your Blog Posts widget you may experience a problem in getting the Blogger Jump Break feature to work. In this event you can edit your Blogger template to enable Jump Breaks.- As a precaution back up your template by downloading full template to your own computer
- Tick the Expand Widget Templates checkbox
- Using CTRL + F find the following line of code:
<data:post.body/>
- Directly below this line insert the following code into your Blogger template:
<b:if cond='data:post.hasJumpLink'>
<div class='jump-link'>
<a expr:href='data:post.url + "#more"'><data:post.jumpText/></a>
</div>
</b:if>
- As a precaution back up your template by downloading full template to your own computer


In this tutorial you have learned how to create expandable post summaries using the new Blogger feature Jump Breaks. You now have the option to easily insert Jump Breaks into your Blogger posts so that longer posts appear with only an introduction followed by a Read More link.
I have shown you 2 methods to insert the Jump Breaks and Read More links into your Blogger posts depending on whether you are using the new or old post editor features. I have also given you some tips to make sure you get the most out of the Blogger Jump Break feature including what to do if the Jump Breaks feature does not work with your customized Blogger template. As always I would welcome your feedback about your experiences with the expandable post summaries Blogger feature (Blogspot feature) or any other feature you may be having an issue with.
Related Articles
List of Blog Know How Tutorials for Blogger Blogs
Blogger Buzz - You Might as well Jump!
Comments
Post a Comment